简介
本文介绍一个IPQ4019的MTD分区信息是如何从配置文件一步步传递到linux内核的。 这个过程有几个部分组成,分区信息在编译过程中的传递;升级时写入flash区;设备上电时linux如何得到分区信息。
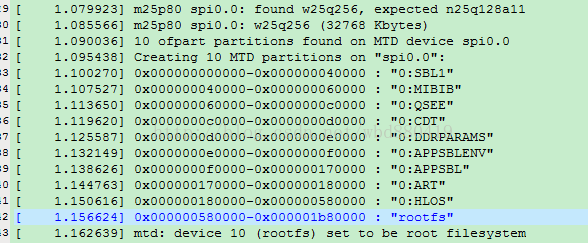
上电后linux打印的MTD分区如下图。
分区信息在编译过程中的传递
原始的配置文件
BOOT.BF.3.1.1/boot_images/build/ms/bin/40xx/misc/tools/config/nor-partition.xml等文件中。
打开以后是如下xml内容。
<partition_versionlength="4">0x4</partition_version>
        <partitions>
                <partition>
                        <name length="16"type="string">0:SBL1</name>
                        <size_kblength="4">256</size_kb> //256KB
                        <pad_kblength="2">0</pad_kb>
                        <which_flashlength="2">0</which_flash>
                       <attr>0xFF</attr>
                       <attr>0xFF</attr>
                       <attr>0x00</attr>
                       <attr>0xFF</attr>
                        <img_nametype="string">sbl1_nor.mbn</img_name>
                </partition>
                <partition>
                        <namelength="16" type="string">0:MIBIB</name>
                        <size_kblength="4">128</size_kb>
                        <pad_kblength="2">0</pad_kb>
                        <which_flashlength="2">0</which_flash>
                       <attr>0xFF</attr>
                        <!-- Specify flashblock size in KB -->
                       <attr>64</attr>
                        <!-- Specify flash density in MB -->
                       <attr>32</attr>
                       <attr>0xFF</attr>
                        <img_nametype="string">nor-user-partition-ipq40xx.bin</img_name>
                </partition>
                <partition>
                        <namelength="16" type="string">0:QSEE</name>
                        <size_kblength="4">384</size_kb>
                        <pad_kblength="2">0</pad_kb>
                        <which_flashlength="2">0</which_flash>
                       <attr>0xFF</attr>
                       <attr>0xFF</attr>
                       <attr>0x00</attr>
                       <attr>0xFF</attr>
                        <img_nametype="string">tz.mbn</img_name>
                </partition>
生成二进制mibib
使用如下命令
/BOOT.BF.3.1.1/boot_images/build/ms/bin/40xx/misc/tools目录下
$ pythonnand_mbn_generator.py config/nor-partition.xml x.bin
生成一个二进制文件。此二进制文件的内容如下:
hexdump -C x.bin
00000000  9a 1b 7d aa bc 48 7d 1f  04 00 00 00 0b 00 00 00  |..}..H}.........|
00000010  30 3a 53 42 4c 31 00 00  00 00 00 00 00 00 00 00  |0:SBL1..........|
00000020  00 01 00 00 00 00 00 00  ff ff 00 ff 30 3a 4d 49  |............0:MI|
00000030  42 49 42 00 00 00 00 00  00 00 00 00 80 00 00 00  |BIB.............|
00000040  00 00 00 00 ff 40 20 ff  30 3a 51 53 45 45 00 00  |.....@ .0:QSEE..|
00000050  00 00 00 00 00 00 00 00  80 01 00 00 00 00 00 00  |................|
00000060  ff ff 00 ff 30 3a 43 44  54 00 00 00 00 00 00 00  |....0:CDT.......|
00000070  00 00 00 00 40 00 00 00  00 00 00 00 ff ff 00 ff  |....@...........|
00000080  30 3a 44 44 52 50 41 52  41 4d 53 00 00 00 00 00  |0:DDRPARAMS.....|
00000090  40 00 00 00 00 00 00 00  ff ff 00 ff 30 3a 41 50  |@...........0:AP|
000000a0  50 53 42 4c 45 4e 56 00  00 00 00 00 40 00 00 00  |PSBLENV.....@...|
000000b0  00 00 00 00 ff ff 00 ff  30 3a 41 50 50 53 42 4c  |........0:APPSBL|
000000c0  00 00 00 00 00 00 00 00  00 02 00 00 00 00 00 00  |................|
000000d0  ff ff 00 ff 30 3a 41 52  54 00 00 00 00 00 00 00  |....0:ART.......|
000000e0  00 00 00 00 40 00 00 00  00 00 00 00 ff ff 00 ff  |....@...........|
000000f0  30 3a 48 4c 4f 53 00 00  00 00 00 00 00 00 00 00  |0:HLOS..........|
00000100  00 10 00 00 00 00 00 00  ff ff 00 ff 72 6f 6f 74  |............root|
00000110  66 73 00 00 00 00 00 00  00 00 00 00 00 58 00 00  |fs...........X..|
00000120  00 00 00 00 ff ff 00 ff  61 64 64 5f 6e 65 77 5f  |........add_new_|
00000130  70 61 72 74 00 00 00 00  40 00 00 00 00 00 00 00  |part....@.......|
00000140  ff ff 00 ff 00 00 00 00  00 00 00 00 00 00 00 00  |................|
00000150  00 00 00 00 00 00 00 00  00 00 00 00 00 00 00 00  |................|
这个add_new_part是作者手动新增加的。
这个文件不会被编译过程动态生成,如需要修改,则要人工生成。这个文件最后会放入mibib区,我们就叫它mibib文件。
已经制件好的mibib文件在BOOT.BF.3.1.1/boot_images/build/ms/bin/40xx/[ nor nor-plus-emmc nor-plus-nand emmc] 这些目录下。
如:
BOOT.BF.3.1.1/boot_images/build/ms/bin/40xx/nor/nor-system-partition-ipq40xx.bin
编译打包
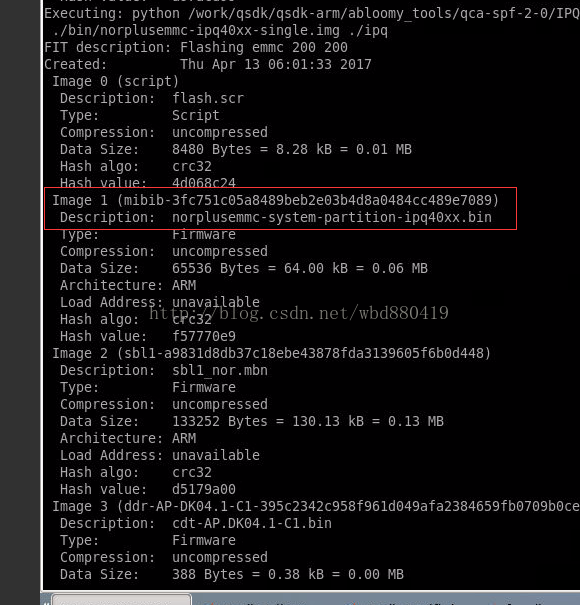
在编译过程中,大家可以看到如下日志。Image1位置打包的文件就是norplussemmc-systerm-partition-ipq40xx.bin。它的来源就是上面的目录的文件。
升级时写入flash区
使用uboot升级或是sysupgrade升级,会把mibib文件写入mibib的MTD区。

这个区内容非常重要,如果不正确,则系统连uboot也进不去。
设备上电时linux如何得到分区信息
高通MSM系列芯片上电过程。
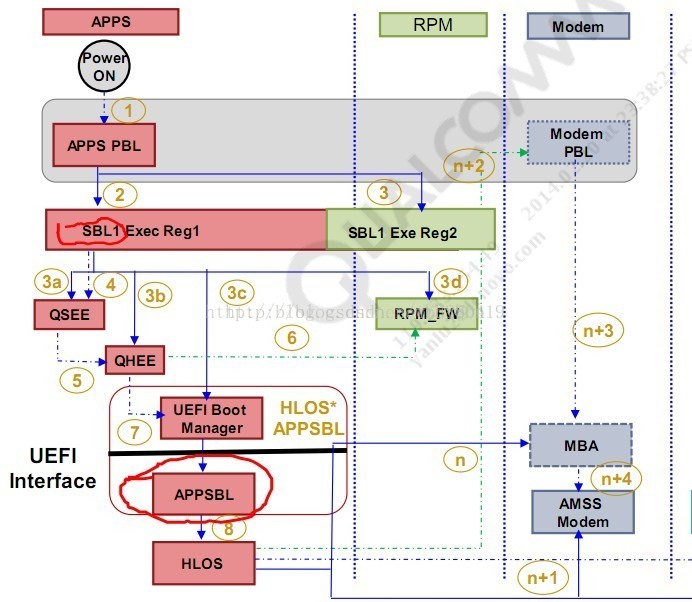
APPSBL是我们的uboot区。
从串口日志可知在uboot输出日志前的日志如下:这部分日志是SBL程序输出的。
Format: Log Type - Time(microsec) - Message- Optional Info
Log Type: B - Since Boot(Power OnReset),  D - Delta,  S - Statistic
S - QC_IMAGE_VERSION_STRING=BOOT.BF.3.1.1-00096
S - IMAGE_VARIANT_STRING=DAABANAZA
它的程序放到了0:SBL1区。它会读取mibib区,如果读不正确,则SBL程序会挂死。本人亲测。
SBL把分区信息传给UBOOT
Uboot修改FDT信息
Uboot读取mtd[0]区上的信息

从nandinfo[nand_env_device]读取数据,其中nand_env_device = 0.
取parts信息
Smem_getpart
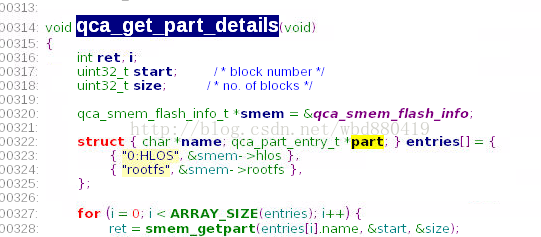

Smem_getpart从smem的全局变量中找出 parts的名称,size等信息。其中一些size信息保存在了nand_info中。
Setenv mtdparts并安装到设备树
FDT = flat device tree.

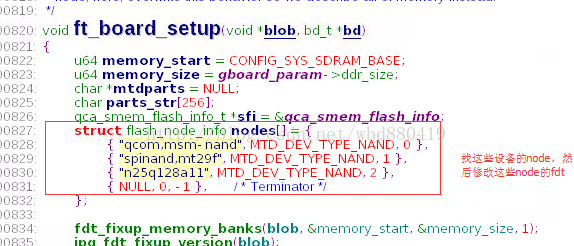
Fdt_node_set_part_info就是用来修改partition信息的函数,它把partition信息加入了FDT中。
Ft_board_setup -> Ipq_fdt_fixup_mtdparts->fdt_node_set_part_info.
Linux读取过程
Mtdparts的两种解析方式,一是ofpart,二是cmdpart,ARM使用第一种,lsdk使用第二种。

在spi总线被注册以后,会扫描下面的设备,它会了解到下面有一个m25p80的flash. 在m25p80驱动加载时,会按dev->of_node的信息(这是设备树解析成功后的结构)调用mtdparts的解析方式一步步加载分区。 在加载spi总线注册之前,设备树就已经都建立成功。设备树的源文件在:
qsdk/qca/src/linux/arch/arm/boot/dts
相关dts文件不包含MTD分区信息。
最后在设备树下的结果如下:
[root@Abloomy:m25p80@0]# cd /proc/device-tree/soc/spi@78b5000/m25p80@0/
[root@Abloomy:m25p80@0]# ls-lat
-r--r--r--    1 root    root             4 Apr 21 05:23#address-cells
-r--r--r--    1 root    root             4 Apr 21 05:23#size-cells
-r--r--r--    1 root    root            11 Apr 21 05:23compatible
-r--r--r--    1 root    root             4 Apr 21 05:23density
-r--r--r--    1 root    root            18 Apr 21 05:23linux,modalias
-r--r--r--    1 root    root             7 Apr 21 05:23name
dr-xr-xr-x    2 root    root             0 Apr 21 05:23partition@0
dr-xr-xr-x    2 root    root             0 Apr 21 05:23partition@170000
dr-xr-xr-x    2 root    root             0 Apr 21 05:23 partition@180000
dr-xr-xr-x    2 root    root             0 Apr 21 05:23partition@40000
dr-xr-xr-x    2 root    root             0 Apr 21 05:23partition@580000
dr-xr-xr-x    2 root    root             0 Apr 21 05:23partition@60000
dr-xr-xr-x    2 root    root             0 Apr 21 05:23partition@c0000
dr-xr-xr-x    2 root    root             0 Apr 21 05:23partition@d0000
dr-xr-xr-x    2 root    root             0 Apr 21 05:23partition@e0000
dr-xr-xr-x    2 root    root             0 Apr 21 05:23 partition@f0000
-r--r--r--    1 root    root             4 Apr 21 05:23reg
-r--r--r--    1 root    root             4 Apr 21 05:23sector-size
-r--r--r--    1 root    root             4 Apr 21 05:23spi-max-frequency
-r--r--r--    1 root    root             0 Apr 21 05:23use-default-sizes
dr-xr-xr-x   12 root    root             0 Apr 21 05:23 .
dr-xr-xr-x    3 root    root             0 Apr 21 05:23 ..
[root@Abloomy:m25p80@0]#
UBOOT的fdt命令
这说明uboot可以修改fdt.
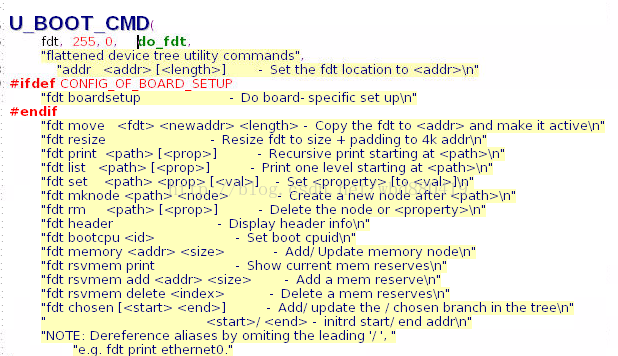
其中一个重要的命令是fdtmknode 它对于应的函数:fdt_add_subnode
文档信息
--------------
* 作者:
* 版权声明:自由转载-非商用
* 转载: []
参考: